| With Autodesk®
Architectural Desktop 3 and 3.3, you have two different methods for
dimensioning AEC objects: using standard AutoCAD® dimensions or
automatically through the AEC Dimensioning System.
The Automatic AEC
Dimensioning System first appeared in Autodesk Architectural Desktop 3
and was originally designed for the European version of the program. Now
these dimensioning routines have become a hit with ADT users everywhere.
In this tutorial
you'll learn how to use this system, which should improve your
efficiency and your productivity. And if you're more comfortable
dimensioning objects with standard AutoCAD dimensions, you still have
those options.
How It Works
Automatic dimensioning is a variant of standard AutoCAD dimensioning and
to use this tool effectively, you should have a good understanding of
the standard system first.
You can only use
automatic AEC dimensions to dimension such AEC objects as walls,
windows, stairs, and structural members.
When you create
automatic AEC dimensions, you pick AEC objects, and dimension logical
points on them. There are a number of logical points—for example, center
of openings, width of walls, dimensioning to outside boundary of
windows, and so on—to choose from for every object. Before adding a
dimension, you must decide which of those points are relevant for your
purposes.
Once you've
selected these logical points, you can apply styles to them. These
logical dimension points are associated with the AEC building objects.
If you move, add to, delete, or otherwise change the dimensioned object,
the dimension points are automatically updated.
Setting Up
Automatic Dimensioning
To access the Dimensioning System, for your drawings, you must select it
during program installation. At some point during the software setup
procedure, the screen shown in Figure 1 appears. Just select the Install
radio button on the International Extensions pane to turn on automatic
dimensioning and then proceed with the installation. If you have already
installed Architectural Desktop without this option, just call for
uninstall which will allow you to add or change features.
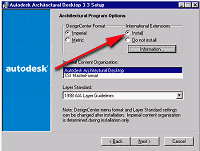
Figure 1: Select the Install radio button under International
Extensions when installing ADT.
(click image to enlarge)
Accessing the
AEC Dimension Toolbar
To access the AEC Dimension toolbar:
1. Select View
>Toolbars > from the main Architectural Desktop menu, which opens the
Customize dialog box.
2. In this dialog
box, select the Toolbars tab.
3. Select AECARCHX
in the menu group and then select the AEC Dimension check box. The AEC
Dimension toolbar displays (see Figure 2).

Figure 2: The AEC Dimension toolbar.
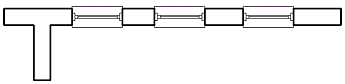
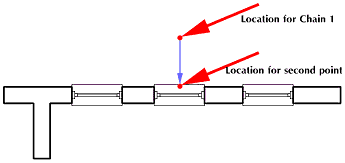
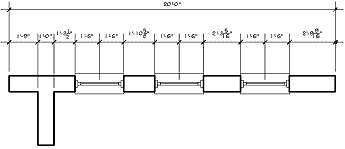
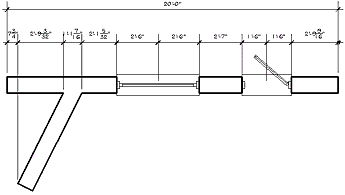
Chaining AEC
Objects
In Architectural Desktop, chains (levels) hold dimension data for
the AEC object. So, for example, Figure 3 has two chains.
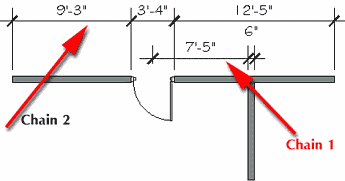
Figure 3: Chains of dimension data.
Autodesk
Architectural Desktop can have up to 10 chains.
Setting
Automatic AEC Dimension Styles
1. Start a new Autodesk Architectural Desktop 3.3 drawing using the Aec
arch [imperial] template, and select the Model layout.
2. Select Format >
Text Style from the main toolbar menu and create a new style named
StylusBT using the TT Stylus BT font.
3. Select the AEC
Dimension Styles icon on the AEC Dimension toolbar (see Figure 4), which
opens the Style Manager dialog box (see Figure 5).
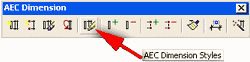
Figure 4: Select the AEC Dimension Styles icon.
4. In the Style
Manager dialog box, double-click the Standard (2 chains) style to bring
up the AEC Dimension Style Properties dialog box.
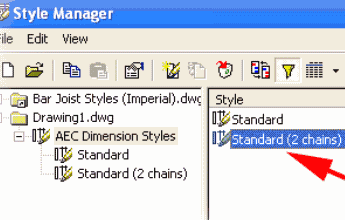
Figure 5: Double-click the Standard (2 chains) style.
5. In the AEC
Dimension Style Properties dialog box select the Display Props tab.
6. Click the Edit
Display Props button to open the Entity Properties dialog box (see
Figure 6).
During software
development, an override was added to the Standard (2 chains) AEC
Dimension Styles. If you open it, you will see that the overide has been
applied.
7. In the Entity
Properties dialog box, select the Contents tab (see Figure 6).
You will set the
automatic dimensioning characteristics from this tab.
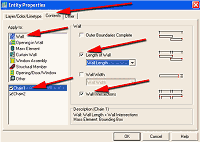
Figure 6: In the Entity Properties dialog box select the Contents
tab.
(click image to enlarge) |
)
)
)
)