by: Nancy Fulton
URL: http://localhost/gotoPointA.jsp?dest=2_3fultadt
|
In this tutorial you'll master the skills required to create and modify a wide variety of sloped roofs using Autodesk® Architectural Desktop software. This is valuable knowledge indeed, since most residential and many commercial structures require sloped roofs. You'll learn how to:
The source
files required for this project are located in the 2_3_adt.zip
(255 KB) file. To transfer these files onto your local hard
drive, click the link. |
|
Creating
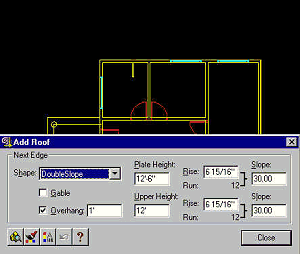
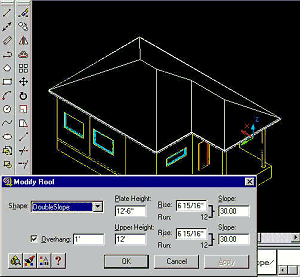
a Sloped Roof 1. Open the 9905a.dwg file from the 2_3_adt.zip file. 2. Select OSNAP on the Status bar to turn on the Object Snap feature. OSNAPs are already configured to snap to endpoints, which is required for this lesson. 3. From the Design Roofs menu, choose Add Roof. 4. In the Plate Height box, type 12'6 (equivalent to 12' 6") to specify the desired elevation of the bottom of the roof, or roof plate. 5. In each Slope box, type 45 (the decimals fill in, and the Rise box updates, automatically). 6. In the Overhang box, type 1' to specify the overhang for the roof. 7. In the Upper Height box, type 12' to specify the height of the roof above the roof plate.
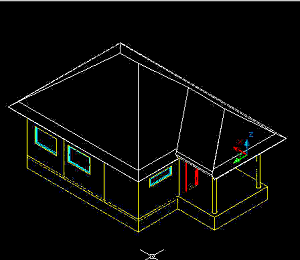
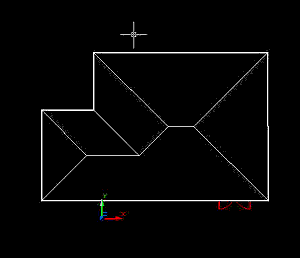
8. Select the corners of the structure to create the desired roof. 9. Press ENTER to complete the roof. Because you are looking at a Hidden view of your roof, the interior of the building disappears. See Figure 3. 10. From the View 3D Views menu, choose NorthWest Isometric to display a 3D view of the roof. See Figure 4.
|
|
Modifying
Roof Parameters 1. From the Design Roofs menu, choose Modify Roof.
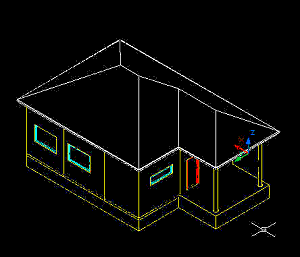
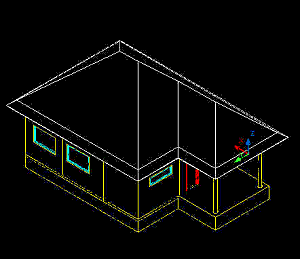
2. Select the edge of the roof you created. 3. In the Overhang box, type 2'. 4. In the two Rise boxes, type 10" to specify the rise for the roof planes. Note that the Slope values change in response to this modification. 5. Choose Apply to implement the roof parameter changes. 6. Choose OK to exit this window.
7. From the Design Roofs menu, choose Edit Roof Edges/Faces. 8. Select the front edge and the side edge of the roof plate over the porch.
9. Press ENTER to indicate that you don't want to select any more objects. 10. In the Roof Faces (by Edge) area, replace the two Slope values in the table with 30. 11. Change the Height value associated with the Face 1 entry, defined when you selected the edges in Step 8, to -10". 12. Choose OK to exit this dialog box. Note the change to the porch overhang.
You will find our version of the file to this point in the 9905b.dwg file located in the 2_3_adt.zip file. Conclusion |
Nancy Fulton is president and founder of OpenCAD International Inc, publisher of the Complete Support for AutoCAD, 3D Studio MAX and 3D Studio VIZ Websites. Her web and CD based curriculums are used in high schools, colleges and universities around the world. She develops training material for Autodesk and writes articles for CADALYST Magazine. She learned to use AutoCAD on Release 9, and served as support consultant and instructor for dealers, authorized training centers and distributors before starting her own business in 1990.