To print: Click here or Select File and then Print from your browser's menu
Archiving Your Drawings the Easy Way
by: Robert Green
URL: http://pointa.autodesk.com/gotoPointA.jsp?dest=3_4grn

Many CAD managers are responsible for drawing storage and archiving at their companies. With all the changes in AutoCAD® software and operating systems over the years, it may seem like lowly file-management tasks have been lost in the features equation. However, if you know where to look, AutoCAD 2000i/2002 software can assist you with everyday tasks like project archiving.

With the Publish to Web Wizard in AutoCAD 2000i/2002, you can create and post web pages that contain summary information, preview images, and other data for each of the drawings in a project. Then—whether you go on to web-publish the pages or not—you can burn the drawings and all the other data to a CD for archiving. This unconventional use of the Publish to Web Wizard makes for an excellent, easy to-use archiving/file-management tool.

In this month's article we'll create a sample web page using the Publish to Web Wizard one step at a time while explaining key options you can use to optimize your project backup. After the Wizard overview, we'll look at the files the Wizard produced and explain what you need to copy to CD to create a comprehensive project backup.

Opening the Wizard
1. You can open the Publish to Web Wizard in several ways:

  • Select the PUBLISH TO WEB icon .
  • Enter PUBLISHTOWEB at the AutoCAD command prompt.
  • From the main AutoCAD menu, click File > Publish to Web.

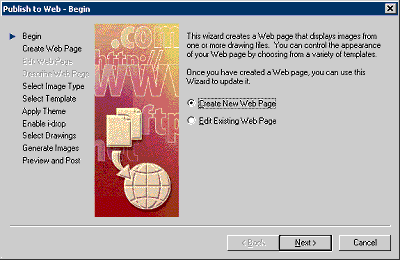
The Begin screen of the Wizard opens (see Figure 1).

2. Select the Create New Web Page radio button, which opens the dialog box shown in Figure 2.


Figure 1: Creation of a web page (or editing an existing web page) begins here.

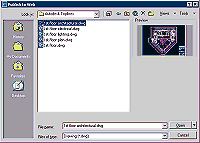
3. Select the first project drawing you'd like to include on the web page (and by extension in your backup set) by navigating to the correct target drive and directory as shown in Figure 2.

4. Click Open.

The Publish to Web—Create Web Page dialog box opens (see Figure 3).


Figure 2: Selecting the first drawing for your web page.
(click image to enlarge)

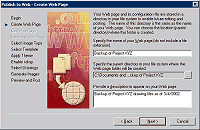
5. Using Figure 3 as a guide:

  • Name the web page using a brief description that will make sense later (like a project number or title).
  • Select the parent directory where the web page folder will store the web configuration.
  • Enter a detailed description of the project web page (optional) with any key dates or facts you'll need to know later when the project is pulled from the backup CD.


Figure 3: Setting the web project's naming and storage options.
(click image to enlarge)

6. Click Next when you are done.

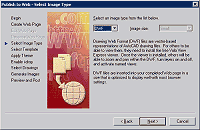
The Publish to Web—Select Image Format dialog box opens (see Figure 4).

7. Select the image format for the drawing files you're preparing for web posting (and by extension for archiving).

This step is important because the drawing images created for the web page will be the basis for browsing through the project backup later on. Since you'll be backing up AutoCAD drawing data, use the Drawing Web Format (DWF) for image files because you can easily view the files later with Autodesk's VoloView™ Express viewer. The only downside to the DWF format is that the machine you use to restore the backup files must have the VoloView Express software (or an AutoCAD license) installed so the machine's web browser can open the DWF files.

Note: The Publish to Web Wizard in both AutoCAD 2000i and 2002 supports the JPEG image format and 2002 also supports the newer PNG format, but these formats create raster, not vector, images. And drawing data is vector based, which DWF supports. If you choose JPEG or PNG, keep in mind that these formats degrade as you zoom in on content and that printing will never be as sharp or controllable as with the DWF format.

8. Click Next when you are done.

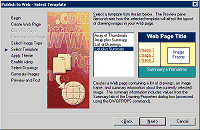
The Publish to Web—Select Template dialog box opens (see Figure 5).


Figure 4: Selecting the graphical format for the drawings on the web page.
(click image to enlarge)

9. Select a template for the web page from the list in this dialog box.

The template you select will determine the look and feel of your web page although it has no effect on web page performance. Even so, take a few extra minutes to browse through the available templates to determine which one best suits your needs.


Figure 5: Selecting the template for the web page.
(click image to enlarge)

10. Click Next when you are done.

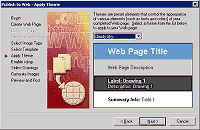
The Publish to Web—Apply Theme dialog box opens (see Figure 6).

11. Select the theme for the web page from the drop-down list.

The theme is really just a color palette so your preference will simply be a matter of choosing a color scheme that is easy to see.


Figure 6: Setting the theme for the web page.
(click image to enlarge)

12. Click Next when you are done.


The Publish to Web—Enable i-drop dialog box opens (see Figure 7).

13. To enable i-drop™ technology for your web page, select the Enable i-drop radio button.

i-drop technology allows users of the web page to drag and drop AutoCAD DWG geometry from the web page into their own drawings. That's valuable. For example, enabling i-drop allows for easy storage and publication of detail or block libraries. For our purpose, which is providing a project backup, enabling i-drop moves a copy of each DWG file for the web page into the website folder, eliminating the need for keeping redundant DWG files in other archives.
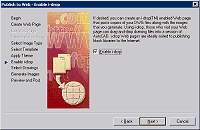

Figure 7: Enabling i-drop technology for your web page.
(click image to enlarge)

14. Click Next when you are done.

The Publish to Web—Select Drawings dialog box opens (see Figure 8).

15. Select the additional drawings you'd like to add to your web page. Using Figure 8 as a guide, perform the following steps for each drawing you add:

  • On the Image settings pane in the dialog box, use the … [ellipsis] button to locate each drawing you want to add.
  • Select the Layout from the drawing you wish to use for the graphical image on the web page.
  • Add any descriptive data you wish in the Description box.
  • Click the Add button to add the drawing to the Image list on the right side of the dialog box.
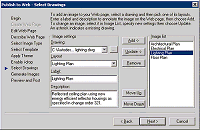

Figure 8: Adding drawings to your web page.
(click image to enlarge)

16. Click Next when you are done.

The Publish to Web—Generate Images dialog box opens (see Figure 9).

17. Select the Regenerate all images radio button to create the graphical images (DWF files in our example) for the web page.

Since this step requires plot file generation, you'll have to wait while the AutoCAD plot engine creates the required files.
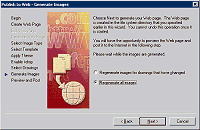

Figure 9: Creating the DWF image files for the web page.
(click image to enlarge)

18. Click Next when plot file generation is complete. The Publish to Web—Preview and Post dialog box opens (see Figure 10).

The last step in the creation of your web page will be to post the page and support files to a holding directory of your choosing.

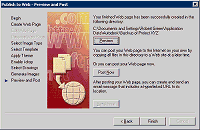
19. Click the Post Now button and point to a directory on your hard drive where your backup web pages will be placed.

You may, optionally, choose to preview your web page by clicking the Preview button to see if any changes to your web configuration are in order before posting.

Note: If you were posting your web page to the Internet or an Intranet server, you would also enter the URL for the page in the form, www.[site name].com, during this step.


Figure 10: Posting your web page to a directory.
(click image to enlarge)

When posting is complete, the dialog box shown in Figure 11 appears.

20. Click OK to exit the Wizard.

Figure 11: Web page complete!

Looking at the Files
During the posting step (see Figure 10) the Publish to Web Wizard creates files within a user- specified folder (in our example, it's called Backup Web) that ends up containing everything you need to view the project web page. A quick examination of the files (see Figure 12) reveals all the required HTML/JS files for the web page, plus DWF graphical images, XML/DWG files (resulting from enabling i-drop), and the varying configuration file the Publish to Web Wizard creates for its own internal bookkeeping.
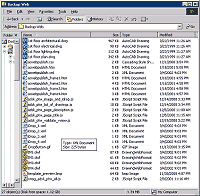

Figure 12: Web files posted to your holding directory.
(click image to enlarge)

Now simply select the acwebpulish.htm file (see Figure 12) and the web page automatically opens in your browser. Why not go ahead and take a tour through your new project archive (see Figure 13)?
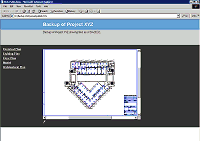

Figure 13: Viewing the completed web page.
(click image to enlarge)

Wrapping Up
The only task that remains is to burn all the files from the posting directory to a CD. Once you've done that, you'll have a complete backup of your project files, which can be viewed at any time by simply retrieving the CD and opening the backup web page with a browser.

Once you get the hang of it, I think you'll find this unconventional usage of the Publish to Web Wizard becomes an integral part of your backup and archiving strategy.


You are probably familiar with the writing of Robert Green. He is the voice of "Managers VPOINT" and "EDM Chronicles" in CADENCE magazine, as well as an industry newsletter on CAD Management. His experience in the mechanical software business includes 15 years of full-time engineering using AutoCAD, MicroStation, and Mechanical Desktop; he started his consulting business, the Robert Green Consulting Group, in 1991.